How to Build a WBS – MS Project
How to build a WBS Structure in Microsoft Project
Creating a Work Breakdown Structure (WBS) is the fourth step in the Project Scope Management process. It involves subdividing the project work into smaller components that can be easily managed and tracked. The lowest level is the work package where costs and resources are allocated.
The WBS can be visual or in a list form, regardless, each component will have a code assigned to it which will be a unique identifier. This code can be a simple numbering system which is the default output used by MS Project when you select ‘Outline’. The code can also be tailored to an organization’s standard coding for a WBS.
As a project manager or engineer, it is important to have a good understanding of the tasks. If component is not broken down enough, you could end up with multiple team members assigned to a very broad task. This could lead to a ‘grey area’ where team members are not directly accountable and responsible for the deliverable. In the end, the task is not tracked properly leading to delays.
As with all these guides, you can go to the MS Project support page for help. This should always be your first source of help. The goal with this guide is to provide more context.
Using the standard Residential Construction Template from MS Project, the example below shows how to add WBS codes.
In Figure 1 below, the project tasks are simply listed. Clearly this is difficult to read. The first thing to do is activate Summary Tasks if this is not your default. Then to add the WBS codes, simply select the Outline Number checkbox
Steps: How to Create a WBS in MS Project
1. Go to Gantt Chart Format
2. Under Show/Hide select Summary Tasks
3. Select Outline Number
Figure 3 shows the WBS codes next to each task. This schedule is now clearly easier to follow and manage.

Figure 1: MS Project Residential Construction Schedule without Summary Tasks Activated
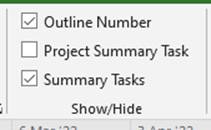
Figure 2: Show/Hide for Selecting the Outline Number to Create a WBS code

Figure 3: WBS Codes Created by Selecting Outline Number
Another option available is to insert a WBS column. This is shown in Figure 4 below. Right click on the column header where you would like the column to be, scroll down to WBS column and insert the column.
IMPORTANT NOTE 1 – Outline numbers can only be numerical and cannot be edited.
IMPORTANT NOTE 2 – Outline numbers will automatically update when tasks are added or deleted.

Figure 4: Using the WBS Column to Display the WBS Code
As mentioned above, some organizations use a custom WBS code to manage projects. We will use the example above to create a custom WBS code.
Steps: How to Create a Custom WBS Code in MS Project
- Go to Project
- Under Properties, select WBS and then Define Code…

Figure 5: Defining the WBS Code
Using the Define Code settings, you can now create your own WBS. In Figure 6 below, the WBS has been structured as follows:
Project code prefix: RES- (Random abbreviation for residential that I chose)
Level 1 – Uppercase Letters which are ordered and only use one number
Level 2 – Ordered numbers and only one number
Level 3 – Ordered numbers and only one number
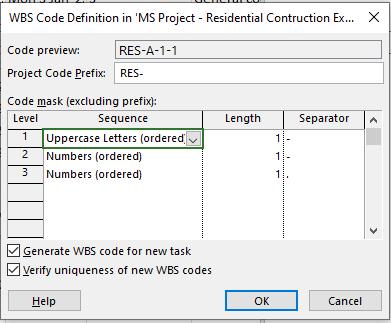
Figure 6: Creating a Custom WBS Code
The final WBS code is displayed in Figure 7.

Figure 7: Customized WBS Code
IMPORTANT NOTE
If you add or delete tasks, the WBS code is not automatically updated. For example, in figure 8, the task in row 7 (RES-A-3-3) was deleted and a new task was inserted between tasks 7 and 9. Take note how the WBS code has not automatically updated.
You can renumber the tasks automatically:
Steps: Renumbering a Custom WBS in MS Project
- Go to Project
- Under Properties, select WBS
- Select Renumber
- Select Entire Project
- Click Okay

Figure 8: The WBS Code does not Automatically Update when Task are Added and Deleted

Figure 9: Renumbering a Custom WBS Code