How to Import Excel Project Files into Microsoft Project
How to Import an Excel Project File into Microsoft Project
It would be awesome if everyone worked with the same project software. But we live in the real world where we have various choices (not a bad thing) but at the same time, as a project manager, this can become frustrating when you are trying to integrate different subprojects into Microsoft Project and the file comes in the form of Excel.
Firstly, if the file was exported from Microsoft Project into an Excel file, it will be simple to integrate with your project. If it was one of those suppliers that still insist on good-old Excel (yes we all have them), then you may need to do a little bit more work.
Important Note – When you import your project file from Excel, remember the ‘Task Name’ column is simply called ‘Name’ – So don’t scroll down to T when looking for the Task column and panic when it is not there – It is there, it is simply called ‘Name’!
One mor tip – If you do find yourself having to import an excel file into Microsoft Project, always first ask the sender whether they exported it directly from Microsoft Project, and if not, can they? Better yet, can they send you the MS project file? Generally, this wouldn’t be an issue within your organisation but it will most likely relate to getting schedules from external contractors. The important point is to ask, all they can say is no, then you move on.
For the examples below, I have simply used an existing MS Project template.
First Example – Importing an Excel file as a New Project that was exported from MS Project
If you have been supplied with an Excel file that was exported from MS Project, then you simply need to import the file.
- Click on File
- Click on New
- Click on New from Excel Workbook

Figure 1: Click on File to Access the Import Wizard

Figure 2: Accessing the Excel File Import Wizard in Microsoft Project
- Open the selected file (You may need to select All Files from the dropdown next to File name: )
- The Project Import Wizard will open
- Click Next
- Keep new Map selected
- Click Next

Figure 3: Select the Microsoft Excel Project File

Figure 4: Microsoft Project Import Wizard

Figure 5: Import Wizard – Map Selection
- Keep the import mode as As a new project
- Click Next
For the next command window, you will select the type of data that you would like to import. There are three selections available. In the example, I will only import the task data, therefore I only select tasks in the next step.
- Select Tasks
- Ensure Import includes headers is selected

Figure 6: Microsoft Project Import Wizard – Import Mode Selection
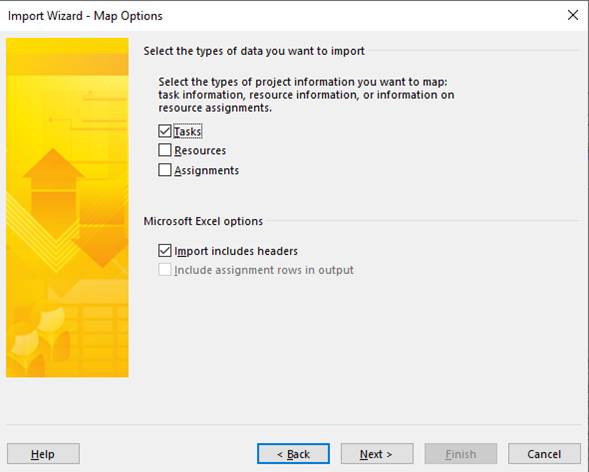
Figure 7: Selecting the Data Type to Import in Microsoft Project’s Import Wizard
The task mapping setting open after selecting the data type. As this imported file was exported from Microsoft Project, the source worksheet is automatically selected. If you import from a new Excel spreadsheet, you will need to select the tab that contains the data.
- Next, verify the data and delete data that you may not want.
- Click Finish

Figure 8: Successfully Imported Project from an Excel File
- Finishing it off, I apply some formatting to the summary tasks and add the outline numbers to give the project schedule a more professional look. It is also easier to follow.

Figure 9: Microsoft Project Import Wizard – Task Mapping Settings

Figure 10: Formatting the Project Schedule for Better Reading
Second Example – Importing an Excel file that was exported from MS Project as a Sub Project
Assuming we have a project schedule up to the point below in Figure 11, we now want to add another summary task from Excel file (exported from MS project). We can again use the Import Wizard to speed up the process.
Note – This example is different to adding a subproject.

Figure 11: MS Project Schedule Example 2
- Follow steps 1 to 8 in example 1 above.
- Select Append the data to the active project

Figure 12: Import Mode Selected as Append the data to the active Project in the Microsoft Project Import Wizard
- Select Tasks as the data types to import
- Ensure Import includes headers is selected

Figure 13: Selecting Tasks as the Data Types to Import into Microsoft Project
- Check the task data and ensure it has imported correctly
- Click Finish
- Go out of the File settings

Figure 14: Import Wizard – Task Mapping Data from an Excel File in Microsoft Project
Notice below that the tasks have been imported into the schedule. The Foundation summary tasks is added as a subtask under Site Work.
Simply outdent the Foundation task and then format it the same as the other summary tasks. See Figure 16 below for the final result.

Figure 15: The Tasks have been Imported in MS Project
Figure 16: The Tasks have been Imported and Formatted
Third Example – Importing an Excel file into MS Project without MS Project mapping
For example 3, let’s assume you get a plain old Excel file from someone who likes to work in the slow lane. See the example Excel file below.
Note – If you are aware of a better method, please let me know. Personally, I would not import a plain Excel file, especially if there are a lot of tasks because of the manual reformatting that is required.

Figure 17: Excel Project Task File
To import this file into Project, simply follow the steps in the examples above. When you get to the Task mapping settings, the source file will not be pre-selected.
- Under Source worksheet name, select the tab that contains the data. In this case it is Sheet 1
- Under To: Microsoft Project Field, select the field required for the tasks and the finish date. In this example, the task header and finish header are named differently and therefore the Import Wizard does not automatically detect them.
- Select Name for the task name column
- Select Finish for the finish date column
- In this example, two errors appear. Click Yes to both, noting what the errors are referring to as this is important to check after the import is completed. These errors occur because the tasks did not have predecessor data.
- Check the predecessors as you will notice row 13 of the excel spreadsheet did not import correctly.
- After importing the tasks, create the summary tasks and format the schedule as required.

Figure 18: Importing an Excel file into Microsoft Project

Figure 19: Checking and Selecting the Data to Import from the Excel file in MS Project

Figure 20: Selecting the Source Worksheet Name in the Task Mapping Settings in Microsoft Project
Figure 21: Verifying and Editing Data to Map into Microsoft Project

Figure 22: Error 1 after Importing the File

Figure 23: Error 2 After Importing the File

Figure 24: The Excel File Tasks have been Imported and Now Require Formatting

Figure 25: Correcting the Predecessor in the Microsoft Project Schedule

Figure 26: Final Format of the MS Project Schedule – Example 3