How to Link Tasks in Microsoft Project
How to Link Tasks in Microsoft Project
In order to show the critical path of your project, you will need to add predecessors to the corresponding tasks. There are multiple methods that can be used to link tasks and this can be done as you develop your project plan or it can be done afterwards.
It is important to understand the different task type dependencies. The default task dependency that Microsoft Project uses is a Finish-to-Start relationship.
The four types of dependencies are Finish-to-Start, Start-to-Start, Start-to-Finish, Finish-to-Finish.
In the examples below, I have used the standard PMI Process template that is available in Microsoft Project. The durations for the tasks have been arbitrarily selected.
Option 1: Clicking the ‘Link’ button
Ensure the predecessor column is visible and if it helps, add the successor column (Figure 1 below).
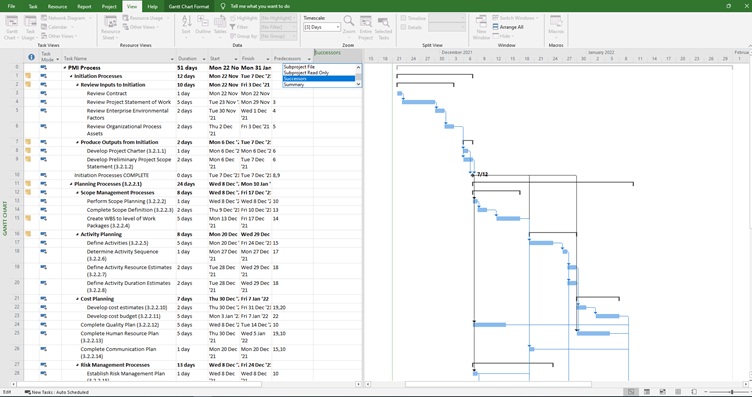
Figure 1: Inserting the Successor Column in the Gantt Chart View In Microsoft Project
Select the first task and then hold down the ctrl key and select the second task. This highlights both tasks. Another way is to drag over the two tasks when the mouse pointer changes to an arrow pointing to the right.

Figure 2: Highlighting Two Tasks to Link in Microsoft Project
TIP: If you have a list of tasks and they will all be completed sequentially, you can highlight all the tasks and click the link button. All the tasks will now be linked with the default FS dependency.
Go to the Task tab, and under the Schedule ribbon section, click on the Link button.

Figure 3: Finding the Task Link Button in the Task Tab and Schedule Ribbon in Microsoft Project
You will notice that task 4 (Review Project Statement of Work) now has a 3 indicated in the Predecessors column and task 3 (Review Contract) now has a 4 indicated in the Successors column. Also note the arrow added between the two Gannt chart bars. The arrow will change according to the type of dependency selected. The default finish-to-start (FS) dependency is created between the two tasks.

Figure 4: Two Link Tasks in Microsoft Project
To change the task dependency type, simply double click on the linking line between the two Gannt chart bars of the tasks. The Task Dependency Settings will pop-up for the two connected tasks. See Figure 5 below.

Figure 5: Double Clicking on the Gantt Chart Task Dependency Arrow to Change the Default Dependency and to Add Lag in Microsoft Project
In Figure 6 below, the dependency has been changed to Start-to-Start without any lag. Notice how the abbreviation ‘SS’ is added to the tasks in the Predecessor and Successor columns. The Gantt Chart bars are also now linked with the appropriate Start-to-Start arrow.
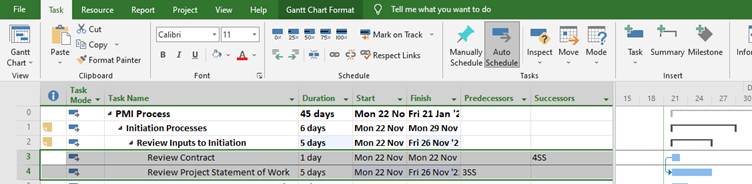
Figure 6: Changing the Task Dependency to Start-to-Start with No Lag
In Figure 7 below, instead of leaving the lag at 0, I have added 2 day. This is shown again in the Predecessor and Successor columns with the ‘+ 2 days’ addition. Also note the difference in the Gantt Chart tasks bars and the linking arrow.

Figure 7: Adding a Start-to-Start Dependency with 2 Days Lag in Microsoft Project
Option 2: Enter the task ID number
For this option, you simply type in the ID number of the predecessor task in the predecessor column. If you have the successor column visible, the ID of the dependent task will then be visible too.
You can also easily change the dependency type by simply entering the task ID followed by the corresponding abbreviation. Furthermore you can either add lag or lead by using a plus (+) or minus (-) sign followed by the quantity and duration type, i.e. hours, days, weeks, etc.
Figure 8 shows the schedule before I change the dependencies as well as add and lead or lag to the tasks. Figure 9 shows the changes entered:
Task 8 – Develop Project Charter = 6FS -1 day (This means 6 must finish before tasks 8 can start but there is a lead of 1 day meaning it can actually start a day earlier).
Task 13 – Perform Scope Planning = 10FS + 0,5 weeks (Task 10 must finish before task 13 can start and there is a half a week delay).

Figure 8: PMI Process Linked Tasks in Microsoft Project

Figure 9: Adding Lead and Lag in Microsoft Project
Option 3: Use the Gantt chart
In the Gantt chart, click and drag from the first task bar to the dependent task bar which creates a chain and then links the two tasks.

Figure 10: Using the Gantt Chart to Link Tasks
Option 4: Use the task information settings
Open the Task Information dialog box, under Predecessors select the dependent task by using the dropdown list. You can also enter the dependent task ID. Additional options include adding lag to the dependency type selected.
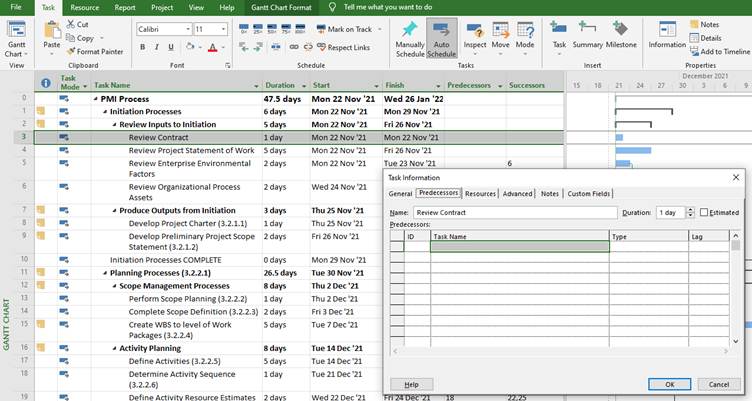
Figure 11: Open the Task Information Dialog Box in Microsoft Project to Link Tasks

Figure 12: Linking a Task Using the Task Information Dialog Box in Microsoft Project